Basic Inventory Management
Square’s inventory management gives you basic tools to keep a clear count of in-stock items in your item library. For items with inventory enabled, the stock count will update based on sales from the Square app, Square Invoices and for orders shipped through your online store.
To use inventory management, make sure you’re running the latest version of the Square app on your mobile device.
New to managing inventory? Make sure to check out our best practices for inventory management.
| Seller Community: Ask questions, get answers and hear how other Square sellers are using inventory management. |
Need more robust inventory management features? Explore Square for Retail.
Manage Inventory on Item Editor
Stock Actions
Stock actions allow you to adjust stock levels and apply reasons. For instance, you are able to add or remove stock and assign reasons such as Stock Received, Inventory Re-Count, Damage, Theft, Loss and Return.
Manage Inventory by Item
With inventory enabled, you can receive alerts in your Dashboard for low-stock or sold-out items, so you’ll know when to reorder and restock.
From your online Square Dashboard:
Visit Items & Orders > Item Library in your Square Dashboard.
Select an item from the list.
To edit inventory by item variation, you can click on the variation row.

-
Under Stock Action, enter the reason for adjusting your stock.
-
If you select Stock Received or Restock Return, your stock count will increase for the amount entered in the Add Stock section.
Selecting Inventory re-count will show your current stock amount — enter your new stock amount into the Stock on hand section to update.
If you select Damage, Theft, Loss, Remove Stock will appear so you can enter the amount of affected units. The amount entered will automatically be deducted from your current stock count for that location.
-
Enable Alerts — Select the “Low-stock alert toggle” and enter a low-stock alert amount. If your stock drops below the alert threshold, a stock alert will be generated.
Click Done > Save to confirm your update.

From the Square Point of Sale app:
Tap More from the navigation bar at the bottom of your screen and select Items > All Items.
Create or select an existing item.
Enter a stock amount under the item details or tap Prices, Sizes or SKUs to add stock to an item with multiple variations.
To adjust stock, tap the stock amount°> select a reason°> enter amount to be adjusted.
Save.
You can also go straight to step 3 by pressing and holding an item from your in-app items grid.
Keep in mind, if you have multiple locations, inventory is established, edited and tracked on a per-location basis.
Note: You can also update your inventory alert settings at any time from Email Notifications in your online dashboard.
Unit inventory adjustments on Square Dashboard
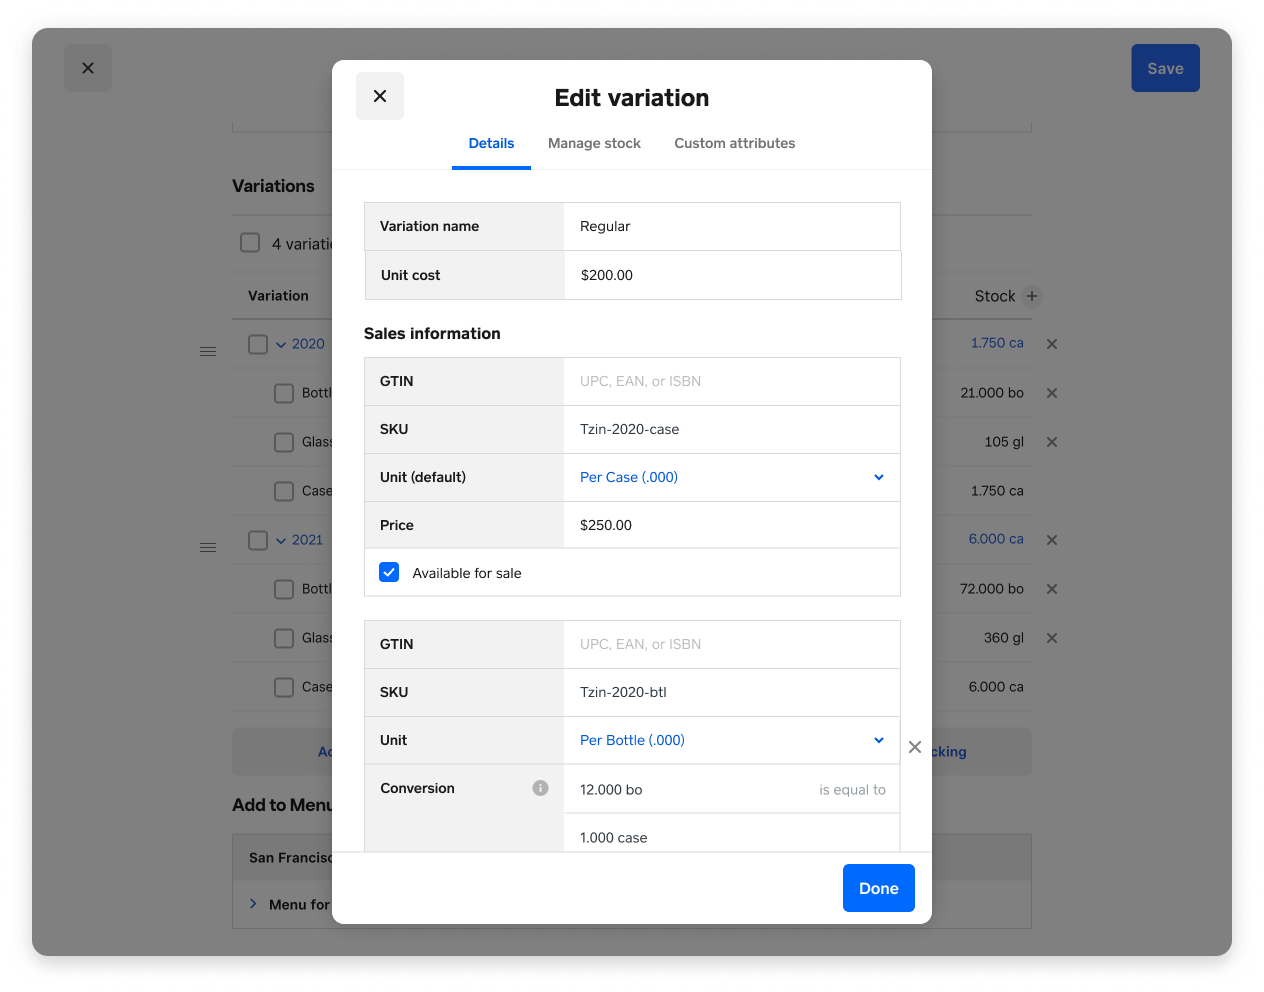
Received stock can often be in units that differ from how the item is sold. For example, bottles of wine can be received in crates, but they can be sold as bottles. You can create a customized unit value for bottles so that the received crates can also be shown as bottles in your inventory. Note that unit conversions cannot be created/updated in the POS. If you have more than one customized unit you would like to include, they must be created in the Units section before proceeding to Variations for stock adjustments.
Single Variation:
In the Item tab on your Square Dashboard, go to Item Library and select an item you’d like to make adjustments to.
Scroll down to Variations and click the item variation you want to edit.
In the Edit Variation pop-up screen, select Manage stock > Stock action dropdown.
Select the reason for the change in stock from Stock received, Inventory re-count, Damage, Theft Loss and Restock Return, and enter the unit amount.
Finalize by clicking Done > Save.
Multiple Variations:
In the Item tab on your Square Dashboard, go to Item Library and select an item you’d like to make adjustments to.
Scroll down to Variations and click the item variation you want to edit.
In the Edit Variation pop-up screen, select Manage stock > Stock action dropdown.
Select the reason for the change in stock from Stock received, Inventory re-count, Damage, Theft Loss and Restock Return.
The multiple unit types you created for the specific item will appear (e.g. Crate, Bottle, Glass), select the unit you would like to change and enter the amount.
Finalize by clicking Done > Save.
For instructions on how to do this on other devices, please check this article: Create and Manage Items from the Square App.
Mark Items as Sold Out
Even if you don’t track inventory, you can mark an item or item variation as sold out, in the case that it’s unavailable for sale.
From your online Square Dashboard:
Visit Items & Orders > Items in your online Square Dashboard.
Select the item(s) or item variation(s) that you’d like to mark as sold out.
Click Edit variation details > Manage stock.
Toggle on/off the Mark as sold out on Point of Sale and Online option.
Click Done.
From the Square Point of Sale app:
Tap More from the navigation bar at the bottom of your screen and select Items > All Items.
Select the item(s) or item variation(s) that you’d like to mark as sold out.
From the Edit Item screen, tap the variation(s) to open up the Edit Variation screen.
Toggle on/off the Label as sold out at this location option.
Tap Done > tap Save.
Note: This will also label the item or item variation as sold out in Square Online.
Schedule an Automatic Restock
You can also schedule items marked as Sold Out to restock automatically. Set a specific day and time for the items to automatically restock, or use your business’s end of day to keep your stock accurate and up to date.
To schedule an automatic restocking time:
From your Square Dashboard, go to Items & Orders > Items > Item Library.
Select the item you want to schedule.
Under Variations, click the Stock count. Note: If the stock is zero, the stock count may show as None or a dash.
An “Edit variation” window will pop up. Under “Manage stock,” toggle on Mark as Sold Out and Choose a time to make it for sale again.
You can choose to keep the restock scheduled for the end of your business day or to use the date selector to choose a custom date and time.
Select Done > Save.
Once you schedule an automatic restock time, a calendar icon will appear in the Stock line under Variations for that item.
Note: Your end of day is based on your set business hours. To edit these hours, go to Account & Settings > Business > Locations.
Enable Inventory in Bulk
You can also enable inventory from your Inventory Excel (.xlsx) or CSV report:
Visit Items & Orders > Items in your Square Dashboard.
Click Actions > Export Library.
Open the file and add your inventory by item in the column labelled New Quantity [Location]. Any changes made to the New Quantity column will replace the existing item quantity. If you put a 0 in the New Quantity column, your inventory for that item for that location will be set to 0.
Save the file to your computer.
Drag and drop your saved file to the Import Inventory window > click Upload.
Manage Inventory and Alerts In Bulk
The Import tool allows you to download a report of your current inventory and update your inventory quantities in bulk. This is especially helpful for adding new inventory and verifying current stock.
To download an inventory report or make updates to your inventory in bulk:
Visit Items & Orders > Items in your Square Dashboard.
Click Actions > Export Library.
In this report, update your Stock Alert Enabled [Location] and New Quantity values and save the Excel (.xlsx) or CSV file to your computer. Note: At this time, Excel (.xlsx) and CSV (.csv) file templates are the only supported file types for bulk import. Custom templates aren’t supported.
Drag and drop your saved file to the Import Inventory window and click Upload > Confirm > Done.
To print this information for your records, Visit Item Library > click Actions > Export Library and follow the on-screen prompts.
Note: To bulk-edit or create your item library, click Actions > Import Library.
History
You can view your inventory history and gain insights into the flow of your inventory by viewing historical adjustments.
To get started:
Visit Items & Orders > Items in your Square Dashboard.
Click on a specific item to bring up the item details page.
Select View Inventory History.
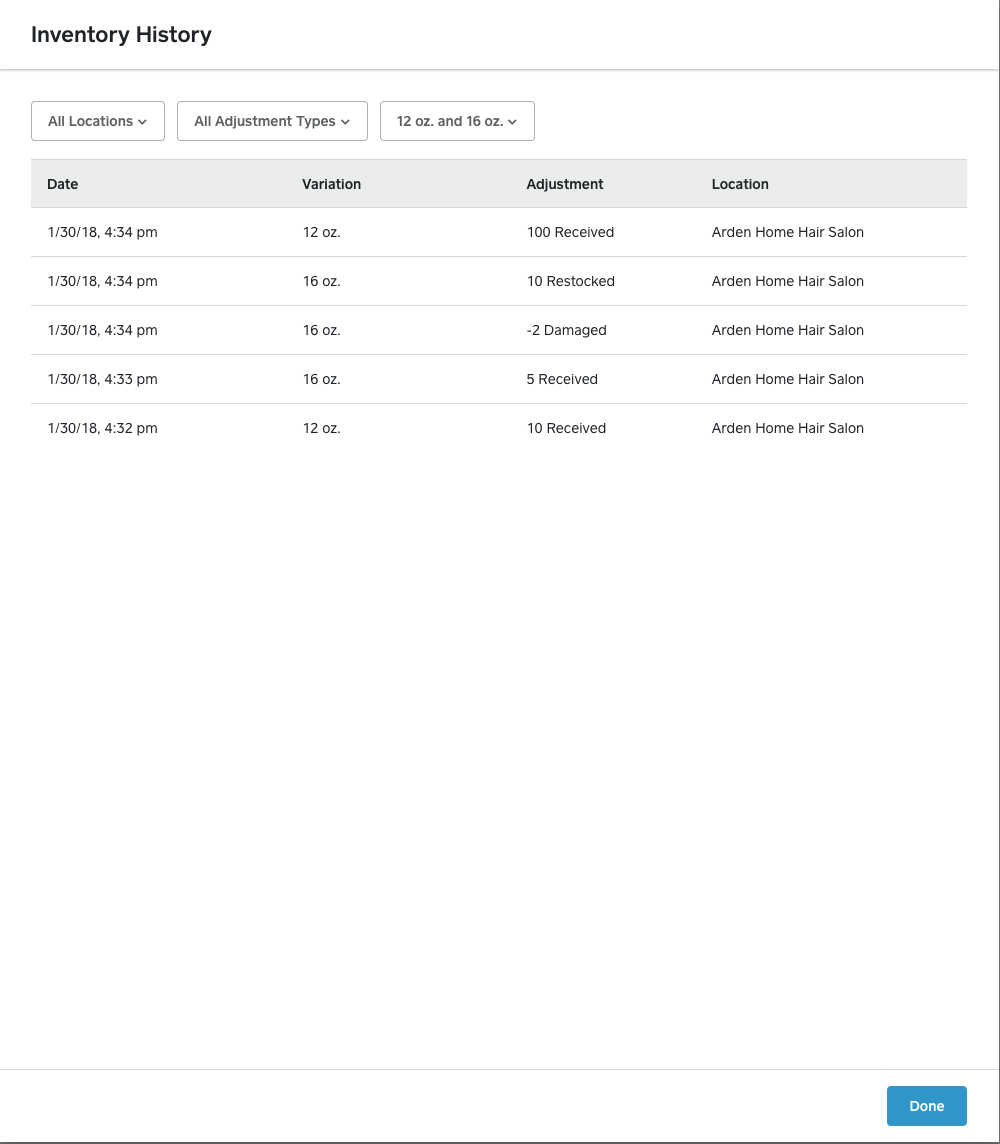
You can filter by location, adjustment type and item variation.
Component Inventory
If you’re subscribed to Square for Retail Plus, you can mark any item variations—such as components or ingredients of a bundle—as non-sellable.
This feature is helpful when the item is not sold directly to customers so you don’t want it to appear online or at checkout on your Point of Sale. For example, you can track inventory of packing materials like cardboard boxes for delivery, but cardboard boxes aren’t sold separately to your customers.
To set up non-sellable variations:
- Go to Items in your online Square Dashboard.
- Select an item to open the “Edit Item” view.
- Scroll down to “Variations,” then click Edit variation.
- Add the variation name, unit cost or vendor.
- Under “Sales information,” disable the This can be purchased toggle.
- Click Done.
- The variation will appear as “This variation is non-sellable” in grey font. Click Save to return to your Item Library.